Sunday 30 June 2013

Paul Harret : Black and White Photography Submission

Photographer: Paul Harret

"Dahliya Blooms"

“This Dahliya blossoms capture the fresh drops of rain as the image makes a beautiful extract out of nature's innumerable wonders. The softness of the petals and the delicate hugging of the water droplets spells ecstasy."


 Published in Vol 1; Ed 15

To submit your photos in Black and White Photography contest, e-mail, planetaurangabadnews@gmail.com

Sanket Kulkarni : Black and White Photography Submission

Photographer: Sanket Kulkarni

"My Hunger Solution ! "

"This photograph invokes memories of every person's childhood when we suckle our thumbs when hungry. This little child's innocent moment was captured just in time to render a classic moment frozen forever in black and white. The image feels alive, isn't it ? "


 Published in Vol 1; Ed 14

To submit your photos in Black and White Photography contest, e-mail, planetaurangabadnews@gmail.com

Visharad D Jadhav : Black and White Photography Submission

Photographer: Visharad Dev Jadhav

"A thing of Beauty"

“This photograph was taken around 4:30 pm. Bibi ka Maqbara stands like an ornament which beautifies Aurangabad. The silence of the surroundings gives a meditative feel to any person visiting this marvelous monument."


 Published in Vol 1; Ed 13

To submit your photos in Black and White Photography contest, e-mail, planetaurangabadnews@gmail.com

Neha Singh : Black and White Photography Submission

Photographer: Neha Singh

" See , I can levitate without flapping my wings!"

“This photograph was taken at an opportune moment when the sparrow's feet weren't touching the ground making it look really out of the ordinary. Hopping around, the sparrow was caught in mid air as the shadow reveals"

Published in Vol 1; Ed 12

To submit your photos in Black and White Photography contest, e-mail, planetaurangabadnews@gmail.com

Sanket Kulkarni : Black and White Photography Submission

Photographer: Sanket Kulkarni

Smoothest Ride Ever

“This photograph shows a contemporary farmer ploughing his field. What were once a humble dhoti and perhaps a bare upper body is now replaced with trousers and a shirt. The bullocks are still the same though, beasts of burden whom a farmer can't do without. "


 Published in Vol 1; Ed 11


To submit your photos in Black and White Photography contest, e-mail, planetaurangabadnews@gmail.com

Tuesday 28 May 2013

Vibhooti Dev : Black and White Photography Submission

Photographer: Vibhooti Dev

Why is nobody using the elevator?

“This photograph was taken at Jantar Mantar in Jaipur. This astronomical observatory was built by Sawai Man Singh of Jaipur and is one of the marvels of scientific architecture. Here, one can see people walking around a sun dial- a solar clock structure.”


Published in Vol 1; Ed 10


To submit your photos in Black and White Photography contest, e-mail, planetaurangabadnews@gmail.com

Visharad D Jadhav : Black and White Photography Submission

Photographer: Visharad Dev Jadhav

Smitten by Kitten

“Two kittens were playing with each other under foliage when my gaze suddenly made them conscious. Cutw little sibling kittens with innocent eyes are a treat to watch. Their fun nature is amazing.”


Published in Vol 1; Ed 9


To submit your photos in Black and White Photography contest, e-mail, planetaurangabadnews@gmail.com

Akshay Khond : Black and White Photography Submission

Photographer: Akshay Khond

Love has no definition, boundaries…


Published in Vol 1; Ed 8


To submit your photos in Black and White Photography contest, e-mail, planetaurangabadnews@gmail.com

Gaurav Jajoo : Black and White Photography Submission

Photographer: Gaurav Jajoo

“A beautiful myna caught against the backdrop of foliage and cactii. The dark hues of its feathers from an excellent contrast with the lighter surroundings. I guess that is what makes the photograph surreal.”


Published in Vol 1; Ed 7


To submit your photos in Black and White Photography contest, e-mail, planetaurangabadnews@gmail.com

Prasanjeet Gaikwad : Black and White Photography Submission

Photographer : Prasanjeet Gaikwad

"Captured in the bustling Chikalthana market in the city, this beautiful little girl is balancing herself in a rope as she also balances the tiny utensils on her head. Her attentive face is beautifully poised as she completes the act."


Published in Vol 1; Ed 6

To submit your photos in Black and White Photography contest, e-mail, planetaurangabadnews@gmail.com

Wednesday 8 May 2013

Smartphone Photography Tips


What's the advantage of shooting with your smartphone ?

In short, it’s a time-saver: You can shoot, edit, and list your photos in one go. And you won’t get caught up in cords to transfer photos from your phone to a computer. Secondly, if you don’t have a DSLR or a point-and-shoot, phoneography will save you money.

1. Make sure you have plenty of light. This is particularly useful when you are doing a product , person or object photography.When you’re shooting in a low-light environment, your smartphone knows. To compromise, your phone adjusts the exposure to let in as much light as possible. The result is “noise” — that not-so-pretty grainy look. Here’s the fix: Fill your shooting area with light! We recommend the following three tips to illuminate your product from every angle. You’ll achieve the best results with all three, but if anything, choose one of the first two and a bounce card.
  1. Shoot near a window.
  2. Use an external source of light, such as a flash or lamp.
  3. Use a bounce card, which is a white mat board or foam.

2. Use a tripod or a timer. Camera shake comes from touching your camera to set off the shutter. Though you might think your phone should be able to remain still while you tap the shutter, truth is, it’s so lightweight and small that it shakes ever so slightly. 

3. Avoid zooming. Using your phone’s zooming feature delivers similar results as cropping your photo to provide a closer view. The process actually decreases the quality of your photo because it enlarges your photo without changing the resolution. If your goal is to take quality item close-up shots, try phone lenses. Macro lenses provide an incredibly close-up view of your product, which is good for showing fine detail. You can also play around with fisheye, telephoto, and wide-angle lenses. 

Smartphone Editing Tips

1. Shoot a-plenty, then edit down. Your phone’s photo gallery is like your contact sheet, a term that photographers used back in the analog days for a sheet that displayed all their negatives on one page. Seeing similar shots side-by-side will help you figure out which angle looks the best. Nowadays, Adobe Lightroom or Adobe Bridge serve as a digital version of a contact sheet.
Pro Tip: Don’t be afraid to shoot lots of photos — change up the angles, backgrounds, or setups. Viewing your “contact sheet” will help you quickly edit down.
2. Sharpen. Sharpening your photos will bring out item details that buyers are eager to see. A number of editing apps include sharpening tools. I like Snapseed because it has other useful tools and is free for both iOS and Android users.
3. Enhance color. There are several photo editing tools. You might not even have to go to an external app to get your photos looking good before you upload them. You’ll want to pay attention to how bright, dark, or off-color your photos are. The tools include an auto-enhance feature, which provides a subtle boost in brightness and color — so you can get creative with your item photos.
Pro Tip: If your photo has a strange blue or orange hue, you’ll want to adjust the white balance. Snapseed has a good white balance tool. 
4. Rotate and crop. Do you have a perfect item photo that needs just a tweak of positioning or framing? Keep in mind, if you need to significantly crop the photo, you might be better off re-shooting.
Story and Photo by Lisbeth Ortega
Lisbeth Ortega is the editor of Photojojo. For more phoneography tips, check out Photojojo University

Saturday 4 May 2013

Free Tarot Consultation to Planet Club Members


Planet Club Members are always at an advantage !

Here's a little flashback... in our Vol1 Issue4, we had introduced you to Tarot... just in a matter of two issues, we have already received loads of questions for our awesome panellist - Ms. Shruti Chopra of It's Tarot..

Keep the questions coming in....

Saturday 27 April 2013

Make a Woven Paper Artwork

Remember we told you in our Vol -1 ; Issue - 4 - we taught you to make a woven paper artwork ... Also we told you that you can see larger bigger and color pictures on our blog..

So here we go..

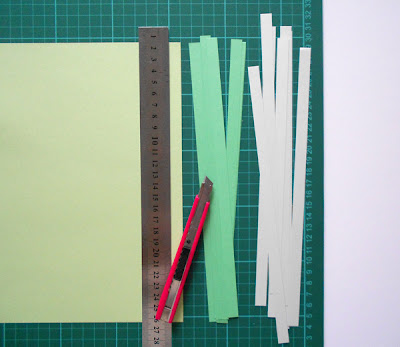
You will need

  • White light weight card
  • Coloured light weight card – I’ve used 4 different colours in the finished piece
  • Self-healing cutting mat
  • Metal ruler
  • Craft knife
  • Pencil
  • Tape

Step 1: Measure and Cut the Artwork Base

Cut a square measuring 32 x 32 cm from the white card. If you are measuring in inches it will be easier to work in half inch increments than to convert centimeters to inches. So cut your white card to 16 x 16 inches.
Now measure the border and cut the vertical lines.
If you’re working in centimeters.
Measure and rule a border 4 cm in from each edge.
Measure and mark 1 cm increments along the top and bottom border lines.
If you’re working in inches.
Measure and rule a border 2 inches in from each edge.
Measure and mark half inch increments along the top and bottom border lines.

Using the metal ruler, knife and cutting mat, cut vertical lines between the top and bottom borders at each increment pencil mark. At one end cut slightly past the border line by 2 mm or one sixteenth of an inch. You will have 24 vertical strips.


Step 2: Measure and Cut the Coloured Card Strips

You’ll need six sets of four strips. I used four emerald green, four lime green, 4 tangerine, and 12 grey green.
If you’re working in centimeters.
Measure and cut 1 cm  x 26 cm strips from the coloured card.
If you’re working in inches.
Measure and cut half inch  x 13 inch strips from the coloured card.

Step 3: Start Weaving

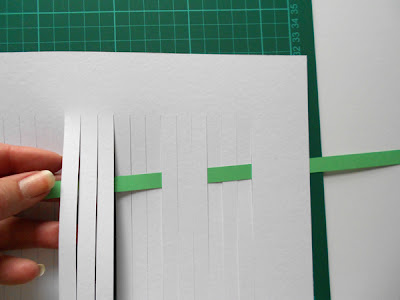
This pattern basically involves weaving under three vertical strips, then over three, repeated across the width of the base card. The only exception to the pattern of threes is at the beginning and end of some rows.
Take the first strip and working from right to left (if you’re right handed) weave across the top of the first three vertical strips and under the next three and continue over three, under three until you reach the end.
Turn the base card over and carefully push the coloured strip right up to the top as far as it will go. Make sure it is centered so the overlap on each side is the same.


Step 4: Creating the Pattern

Bring the second coloured strip through from the back of the base card between the first and second vertical strips. To create the chevron pattern the second row follows the three over, three under pattern, but commences one strip in from the edge.


When you’ve finished the row turn the base card over and push the coloured strip up to butt against the first strip.

Following the pattern, the third paper strip comes through from the back of the base card between the second and third vertical strips.

The fourth coloured strip begins between the third and fourth vertical strips. Don’t forget to flip the base card over each time you finish a row and push the coloured strip up snugly against the previous one.

Step 5: Adding the Additional Colours

The first three strips of the second colour follow a mirror image pattern of rows 3, 2 and 1 of the first colour. If this sounds confusing take another look at the finished artwork – it’s easier to follow the pattern when you’re looking at it. 

Continue adding the coloured strips in groups of four.

The last coloured strip will be harder to weave. Put your left hand behind the base card and push the vertical strips towards you to create a space for the coloured strip to pass through.

Step 6: Finishing Off

Flip the base card over and adjust the coloured strips if necessary so they are centered.
Run a line of tape along each side to secure the ends of the coloured strips.


Step 7: Hang Your Art

I like the look of the woven paper art hung with washi tape, but it also looks great framed. Sit back and admire your handiwork. 


Monday 1 April 2013

Atharva Karhade wins the COMMON-YM Competition


ATHARVA KARHADE of 6th Standard from Shreyas Balak Mandir  wins the COMMON-YM Competition which was featured in our last week edition ( Vol. 1 , Issue 1)

Congratulations Atharva ! He has won a Gift Voucher of Orama Xing - the Gaming Zone at Prozone with compliments from Planet Aurangabad.

ANSWERS TO LAST WEEK’S COMMON-YM COMPETITION

As we told you last time, a Common-ym is a group of words that have a common trait. Here are the answers – 

1. A Ball - A Salad - A Coin ----  they can all be tossed 2. A Cork - A Question - A Balloon ---- they can all be popped 
3. A Bottle - A Baseball Player - A Mushroom ---- they all have caps  
4. A Bell - Mouth - A Shoe ---- they all have tongues 
5. A Hockey Game - A Restaurant - A Bank ---- they all have checks